Users And Teams
This is the first tab of the Manage Organization panel (reachable from the main navigation, requires the ADMIN role), split into two parts: the team tree on the left and the table of all organization users on the right.
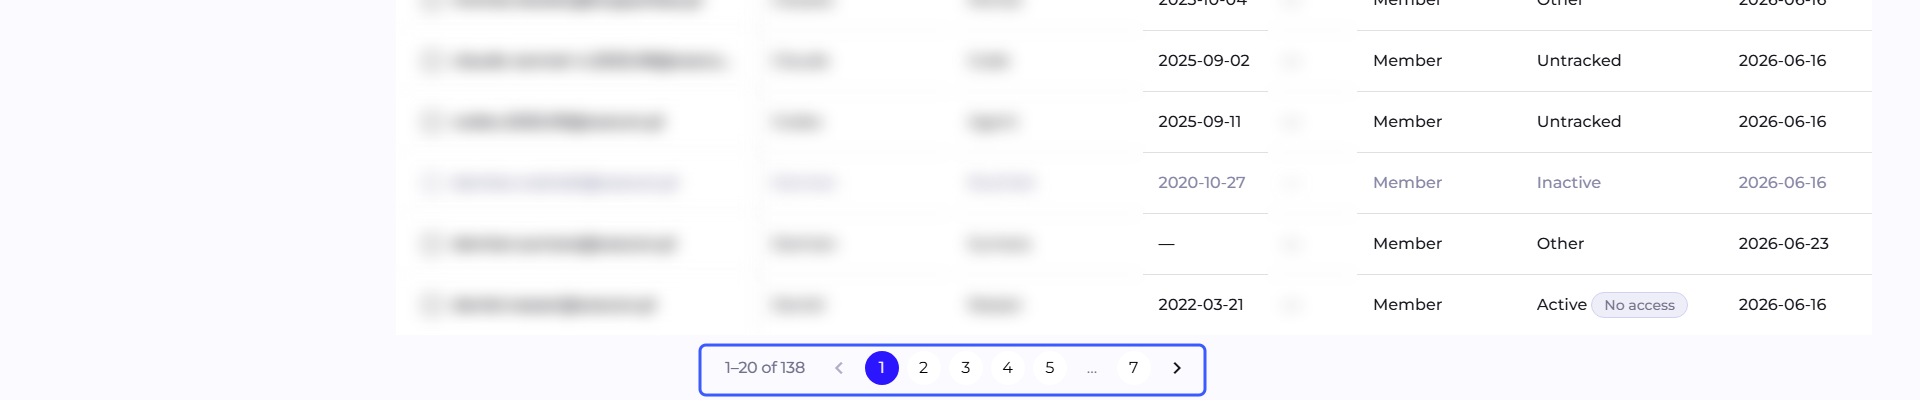
Users table
Columns: E-mail, Name, Surname, Last Increment Date, Aliases, Role, Account Status, Last sign-in, Actions.
Search
The Search field above the table filters all account fields, not only those shown in the columns. The text you type is compared against the e-mail address, name, surname, aliases, roles, account status, official position and seniority, phone number, LinkedIn address, tags, AI tool addresses, and the dates of the last sign-in and the last increment. A fragment of a value is enough, and case does not matter.
Search works within the team selected in the tree and covers every matching row, including rows on further pages of the table. The field itself does not search team names; use the tree to narrow the list down to a single team.
Row markers
Next to the e-mail address you may see the  icon, which marks the manager of the team selected in the tree, with a "Manager" tooltip. The icon refers to the team the selection currently sits on: the same person may not have it in another team. Managers are sorted to the top of the list.
Project manager is a separate role, granted in Projects and shown there as "PM" markers above the project tabs.
Next to the name there may be a shield icon marking an account managed by SCIM.
Role
A multi-select: Member, Admin, or both at once (the table then shows "Member, Admin"). Member grants access to organization data (Overview, Teams, Project, Participant). Admin grants access to this panel. An account with Admin alone (without Member) can reach administration only, without access to data, so after signing in it lands directly on this page instead of on the Overview.
Account status
Six values, five of which actually appear on the list (accounts with the "Alias" status are hidden from this table and managed separately through account merging, see below):
| Status | What it means |
|---|---|
| Active (access) | The account can sign in and has access to data. Shown in the table as "Active" with an additional green "Access" marker. |
| Active (no access) | The account exists and is tracked, but cannot sign in. In the table: "Active" with a "No access" marker. |
| Inactive | An inactive account. |
| Untracked | An account deliberately left out of tracking (for example a technical account or a bot). |
| Other | An edge-case status, assigned automatically during data import, with no way to set it manually from this panel. |
| Alias | An account merged into another one as an alias, it does not appear as a separate row in this table. |
Rows with the Inactive status are greyed out in the table. The status follows from two internal account properties, which is why both Active variants are shown as "Active" plus a marker next to it.
In the organization's license limit, accounts in both variants of the Active status count, while aliases and accounts with the Untracked, Inactive and Other statuses do not take up a seat. An Active account that becomes an alias in a merge frees its seat as a result. → License usage
Accounts with the Other status
The Other status is not assigned by hand. It goes to people detected automatically during scanning: commit and ticket authors whose addresses are not yet on the account list. Q247 then creates an account for them so their work is not lost, but it has no information yet about their place in the organization.
The consequence shows up on the dashboards: the activity of all such accounts collapses into a single aggregate "Others" row instead of appearing separately. As long as an account holds this status, it has no participant page of its own, no metrics of its own, and no place in team tables.
Switching to Active (no access) resolves this without giving anyone access to the application: the person starts being counted as a separate participant, with their own Calories, Increments and position in the tables, but cannot sign in. This is the right status for people whose work you measure but who do not use Q247. This step is also described in Starting code analysis, because skipping it is the most common cause of empty dashboards despite a correctly working integration.
For technical accounts and bots, the right choice is Untracked, which excludes their activity from the calculations.
Account status controls signing in, the way a person is counted in metrics, and whether they are visible separately. Which specific events enter the calculations is decided by other settings: file pattern exclusions, commit exclusion and the increment visibility threshold.
A status change takes effect from the next data read, without recalculating history: just refresh the dashboard.
Creating an account
The "Create Account" button opens the "Create new account" modal with three columns: team selection (a tree with checkboxes), required fields and additional fields.
Required fields: E-mail, Name, Surname, Account Status (choose from: Active (access) / Active (no access) / Inactive), Account role (Member/Admin).
Additional fields: Official position, Seniority (Junior/Regular/Senior/Expert), Country code, Phone number, LinkedIn, Tags.
If the new account has no Member role, the form warns: "Without the Member role, this user won't have access to any teams or data." If the status is "Active (access)", the form states that an activation e-mail will be sent.
Account actions
The "Actions" menu on each row:
- Edit member: opens the full edit form (the same fields as when creating, plus team membership).
- Edit alias: opens the account merge modal, described below.
- Edit AI mapping: shown only when the organization has the AI metrics add-on enabled. Described in the "AI account mapping" section below.
- Change password: shown only on the signed-in administrator's own account, and only when the organization signs in with a password (not SSO).
- Set as active (access) / (no access) / untracked / inactive: four separate actions, only those leading to a status other than the current one are shown.
- Send password reset e-mail / activation e-mail: shown only for accounts with the "Active (access)" status in organizations that sign in with a password, the wording depends on whether the person already has a password of their own set.
- Assign to teams.
- Remove from team: active only when a specific team is selected in the tree and the person is its direct member. For the root team and for membership inherited from a parent team it stays inactive, with an explanation in the tooltip.
The four status change actions lead straight to the values from the table above:
| Action | Status after the change |
|---|---|
| Set as active (access) | Active with the Access marker |
| Set as active (no access) | Active with the No access marker |
| Set as untracked | Untracked |
| Set as inactive | Inactive |
The Other and Alias statuses cannot be set from this menu: Q247 assigns the first one when detecting authors, and the second one arises only through account merging.
Bulk actions
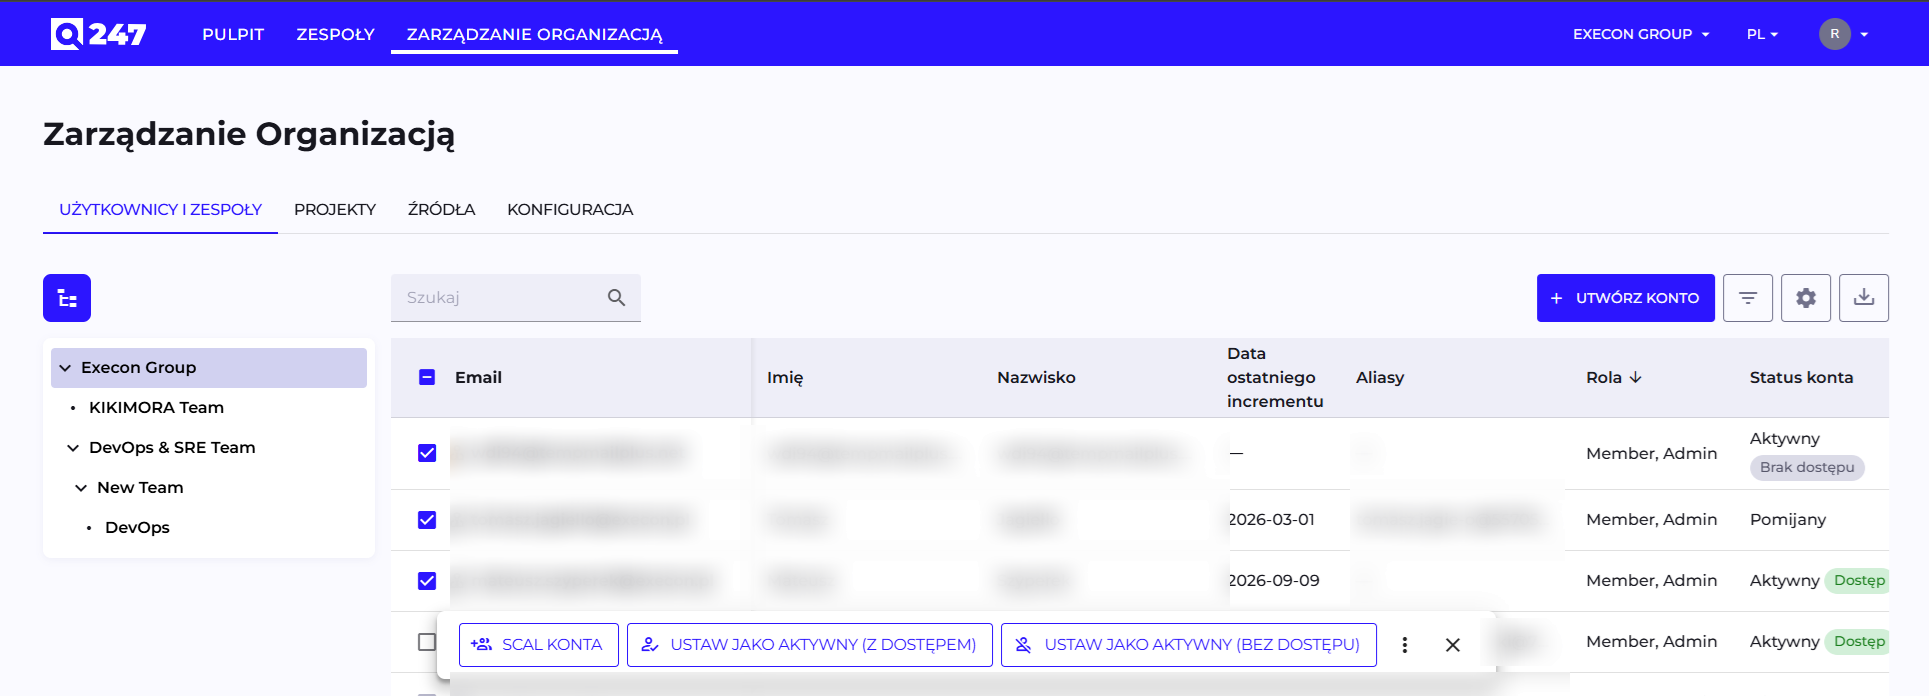
Every row has a checkbox. The header checkbox works on the current page of the table: it selects its rows and adds them to accounts selected earlier on other pages, and clicking it again clears the selection only from the rows of that page. When something is selected but not the whole current page, the checkbox shows a partial state, also when the selected accounts are only on other pages.
The selection stays after you move to another page or change the sorting. To collect accounts from several pages, select them page by page.
The action bar appears after you select the first account, but with one account it has no actions yet. The actions from the table below are available from two selected accounts:
| Action | What it does |
|---|---|
| Merge accounts | opens the merge modal, described below |
| Set as active (access) | changes the status of the selected accounts |
| Set as active (no access) | changes the status of the selected accounts |
| Set as untracked | changes the status of the selected accounts |
| Set as inactive | changes the status of the selected accounts |
| Assign to teams | adds or removes the assignment to the indicated teams |
The bar adapts to the window width: actions that do not fit move under the three-dot button. The order stays the same, so under the dots you always find the tail of this list.
Every bulk action opens a window with the list of accounts it applies to and Cancel and Confirm buttons, so nothing runs immediately after the click. From that list you can still remove a single account with the cross. Q247 skips accounts that already hold the target status, as well as SCIM-managed accounts if the change is blocked for them; the window then states how many accounts were excluded and why.
Bulk actions cover all selected accounts, including those from other pages of the table. The same applies to the Export Selected option in the export menu; while nothing is selected, this option is displayed as inactive. The other option of this menu, Export All, covers all rows matching the current search and filters, with the columns visible in the table.
The selection is cleared by changing the team in the tree, changing the search or filters, and successfully completing a bulk action. The cross on the action bar clears it on all pages. Set the team, search and filters before selecting accounts.
Merging accounts and aliases
The same person reaches Q247 under several addresses: a work one in Jira, a different one in the Git account, yet another from a historical repository. Without a merge, each of those addresses is a separate participant with its own incomplete record, and one person's metrics fall apart across several rows. Merging brings them together into one account.
Reasons to merge
- Complete metrics for one person. Calories, Increments, Lines and Retention are counted from all addresses together, so the result matches the actual work.
- A clean participant list. The project stops showing the same person twice, and Team Capacity stops overstating the headcount.
- Linking automatically detected accounts. Accounts with the Other status, created from commits, can be attached to the right person instead of sitting in the aggregate "Others" row.
Merge procedure
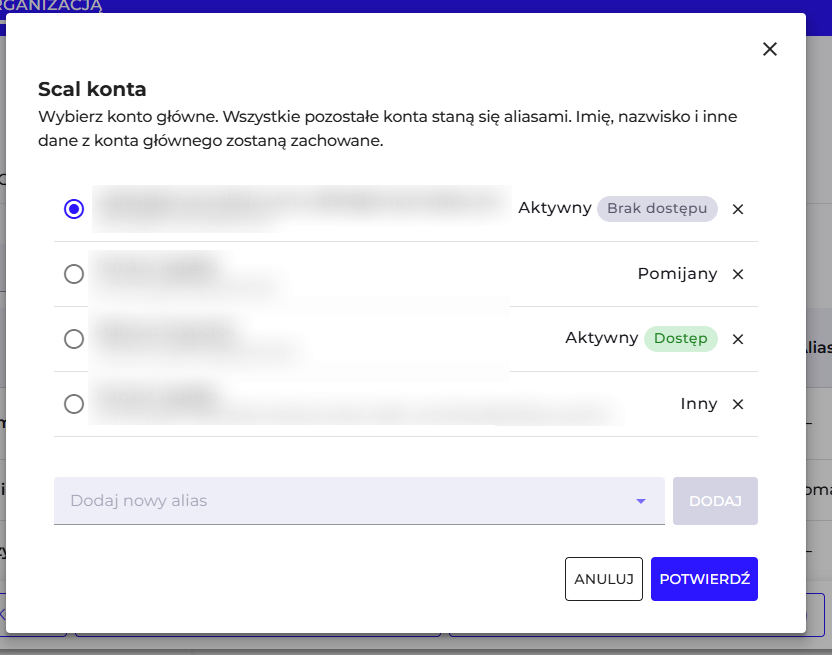
The modal opens from the Merge accounts action (several selected accounts) or Edit alias (a single account together with its existing aliases). The header explains the rule: "Select the primary account. All other accounts will become aliases. The name, surname, and other details from the primary account will be preserved."
-
Select the primary account with a radio button. This is the one that stays on the user list and takes over the record of the others. Pick the account with the right name, surname and status, because the data of the remaining ones will no longer be used.
-
Adjust the list. Each row shows the name, address and account status, and the cross removes it from the group. You attach another account from the organization in the Add new alias field: pick a person from the list and click Add.
The list in the field loads more accounts as you scroll. Until it has loaded all of them, a counter is visible below it: "Showing X of Y. Type a name or e-mail to narrow the list." X is the number of loaded accounts and Y the number of all accounts that can be attached. The phrase you type searches the first name, surname and e-mail address of all such accounts, including those the list has not loaded yet. Letter case does not matter.
When the list cannot be loaded, the window retries on its own. If that does not help, it shows the message "Could not load the list." and a Try again button.
-
Apply with the Confirm button. Q247 shows the outcome next to each row, for example "Linked as alias", "Removed from aliases" or "Already an alias of another account, not added". If any row needs attention, the window stays open.
Effects of a merge
- The alias activity counts towards the primary account from the next data read. History is not rewritten, the assignment is resolved on every read, so the effect shows up after refreshing the dashboard.
- The alias disappears from the users table and from project participant lists. It stays visible in the Aliases column on the primary account.
- The primary account takes over the team and project assignments as well as the alias AI account mapping. On a role collision the higher role wins, that is manager over team member and project manager over participant.
- The alias loses its status and its team assignments. It receives the Alias status, is assigned to the root team only, and cannot sign in.
- An account aliased to somebody else is not taken over. Q247 skips it and reports that in the operation result.
Splitting merged accounts
The reverse operation uses the same window. Open Edit alias on the primary account, remove with the cross the alias that is to be split off, and apply. The row then gets the "Removed from aliases" outcome.
Splitting calls for care, because it restores less than the merge took away:
- The recovered account returns to the user list with the status of the primary account it was detached from, not with the one it had before the merge. When that status cannot be determined, the account gets Inactive and is blocked. In both cases the right status has to be assigned by hand.
- Team assignments stay empty; the account remains in the root team.
- Project assignments and the AI account mapping stay with the primary account.
- Its activity stops counting towards the primary account and returns to itself, again from the next data read.
Instead of splitting and merging again, you can also point to a different account as the primary one: selecting another radio button in the same window moves the primary account role, and the previous primary becomes an alias. The new primary account inherits the status of the previous one, including a blocked access, so a promotion under an account with the Other or Untracked status keeps that status.
AI account mapping
This section is visible only with the AI metrics add-on. The "Edit AI user mapping" modal shows:
- Mapping source: a read-only field with one of three values: "Auto (email)" (an AI account detected automatically by e-mail address), "Manual override" (an administrator refined the mapping by hand) or "Not mapped".
- The list of AI tool e-mail addresses assigned to this person, which you can add to and remove from.
This mechanism links a person's identity in Q247 with their account in an external AI tool (for example a locally configured e-mail in Claude Code), so that telemetry reaches the right person. Full context on the AI Adoption page.
If the e-mail address an AI tool signs its telemetry with is the same address the Q247 account is set up on, the match happens on its own and there is nothing to set. Manual mapping applies only to cases where the two addresses differ, for example when somebody has a private address configured in the tool.
Teams
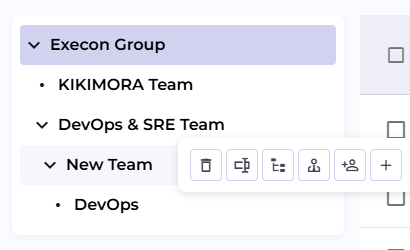
The team tree occupies the left part of the screen and mirrors the organization structure.
Tree structure
The root is the whole organization, "Execon Group" in the screenshot. All users belong to it automatically, so there is no need (and no way) to assign members to it by hand.
Teams sit under the root, and each of them can have subteams of its own, with no depth limit. In the screenshot, DevOps & SRE Team has the New Team subteam, and that one has a further DevOps subteam. The arrow next to the name expands and collapses a branch; after opening the page, only the first level is expanded.
Clicking a node narrows the table to its members, counting the members of all subteams as well. Clicking the selected node moves the selection to the parent team, and the root cannot be deselected. A team with no members shows the message "No team members assigned yet" and an Assign Members button in place of the table.
The blue button above the tree collapses and expands the whole tree panel, giving the table full width.
Node action bar
Hovering over a team reveals a bar of six icons, visible in the screenshot. The icons, from the left:
| Icon | Action | When it is inactive |
|---|---|---|
| bin | Remove team | the root team and SCIM-managed teams |
| text field | Rename team | the root team and SCIM teams |
| structure | Move team, that is point it to a new parent team | the root team |
| person in a suit | Assign managers | always available, including for the root and SCIM teams |
| person with a plus | Assign team members | the root team and SCIM teams |
| plus | Create team, as a subteam of this node | always available |
Every icon has a tooltip with the action name, and when it is inactive, the tooltip explains why. New accounts are created with the separate Create Account button above the table, not from this bar.
The confirmation says so outright: "Deleting this team will automatically move all its members to the parent team. This action cannot be undone." This covers the entire subtree being removed, and assignments to the removed teams are lost.
Limits for SCIM-managed accounts and teams
A team synchronized from an identity provider is marked in the tree with a shield icon with synchronization arrows, and in team selection windows a SCIM label stands next to that icon. Its tooltip reads: "This team is provisioned by your identity provider via SCIM. Selected attributes are managed externally and will be replaced on the next synchronization."
The label means the owner of that team is the identity provider, and Q247 only reflects its state. A change made here would be overwritten on the next synchronization, which is why some actions are disabled for such teams. A team used as a SCIM group mapping target (the administrator group or the access group) does not appear in the tree at all, together with its subteams.
Accounts carry an analogous marker next to the name, with a tooltip explaining that the name, surname, e-mail address, active state and provider-driven roles are managed externally.
If the organization has SCIM configured, some accounts and teams are synchronized automatically from an external system (for example Entra ID, Okta), not manually from this panel.
The specific limits:
- Name and surname: not editable.
- E-mail: always read-only, regardless of SCIM.
- Admin role: not editable only when the organization has mapped a SCIM administrator group. The Member role stays editable.
- Account Status: the lock is granular, not blanket. Changing the kind of status (for example to "Untracked" or "Inactive") is always blocked for SCIM accounts. Switching between "access" and "no access" is blocked only when a SCIM access group has been mapped, otherwise it stays editable.
- Team membership: blocked only for teams that are themselves SCIM-managed. Assignment to an ordinary, manually created team still works even for a SCIM account.
SCIM-managed teams cannot be removed, renamed, or have their composition changed by hand, all of this is controlled by the external identity provider.
See also
- SCIM Provisioning and SSO: identity integrations
- AI Adoption Patterns: configuring the detection of AI commits
- Permissions: the full role and access model
- AI Adoption: how AI account mapping affects metrics